


How to Make Art From Old Bits (No Talent Necessary)
These bits mounted on canvas make for a great “bit” of a conversation piece! Hahaha…no?
I hate horse art. Flowing manes painted in all the colors of the wind, horses galloping off into the sunset? Not my thing. Yet my family members find it hilarious to give me anything and everything that has a horse on it. Like this:
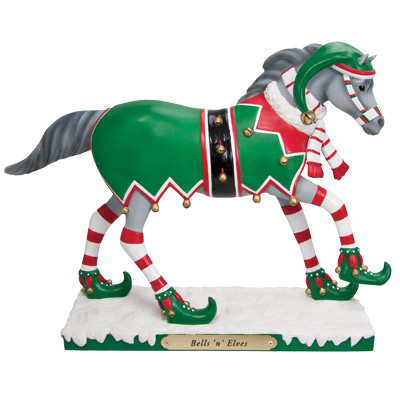
Yes, I actually received this. And yes, I immediately sold it.
I prefer a more subtle approach to equine art. Like this amazing picture I found on Pinterest–I mean seriously, that is a great use of an old bit. You can collect all variety of bits for an interesting display, or memorialize an old friend.
And the great part is–it’s cheap, easy, and aside from drying time, it really only takes 5 minutes to put together.

Here’s how to make it:
1. Assemble your supplies.
- Old bits (pony bits work best for an 8″x 10″ frame). You can clean them up with a toothbrush, vinegar and water, or leave them “distressed” if that’s your style. I bought an assortment from English Tack Trader for $10 each, shipping included.

Bring your bits to the store to test out how they look in different frames. (It’s not as if you don’t already have bits in your car or purse)
- Frames: I used cheapo 8″ x 10″ faux-wood frames, $10 each from Michael’s. Make sure that you don’t cheap out too much like I did initially, and get frames that don’t open up at the back.
- Burlap: If you know how to wrap canvas or burlap, power to you. I bought pre-wrapped 8″x 10″ burlap panels, $5 for a set of three from Michael’s.
- Gorilla Glue: $5 for the smallest size
Total cost: $23 apiece or $70 for three (less if you already have the bits or Gorilla Glue)
2. Remove the glass and mats from the frame and replace them with the burlap-wrapped panels.

If they don’t want to fit…make them fit. Just be careful not to crack the frame.

3. Lay your bit on the burlap where you want it.

Note where the metal touches the burlap. This is where you will glue the bit to the fabric. Use water on a Q-Tip or small piece of paper towel to moisten those points where it lays.

4. Place a VERY small dot of Gorilla Glue on the moistened areas. Gorilla Glue expands as it dries, so use less than you think you need, especially on small areas like the rings of a loose-ring snaffle. Make sure to work from the middle outwards for a snaffle so you can glue the middle joint, cheekpiece joint, and rings on each side.
5. Wait about an hour and try to keep your pets from playing with it. If the bit won’t lay completely flat, put a pan or other large object on top of it to weigh it down and bind the glue.

6. Ta-da! Ready to hang up!


Lessons learned:
- Go for a sturdy wooden frame if possible. It’s way too easy to crack the plastic ones! Not that I would know anything about that…though as I found out, plastic is easy to fix with Gorilla Glue.
- Loose rings on bits were harder to glue accurately because of the small area. If possible, use a bit with D-rings or eggbutt rings.
- Get some adjustable picture hangers, or find someone who actually knows how to measure things to help you hang your masterpieces instead of nailing a bunch of little holes in the wall. (Maybe that one’s more of a tip for me…)

Leave a Comment